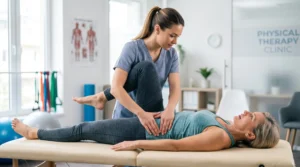
If you’re searching for low back pain exercises physical therapy you can do at home, you’re in the right place. The goal of this guide is simple: calm symptoms, move with less fear, and rebuild strength—without guessing, over-stretching, or pushing into a flare.
Physical therapy for low back pain works best as a staged program rather than a fixed list of stretches. Spend roughly a week settling symptoms with gentle mobility, breathing and walking, then three to four weeks rebuilding hip, trunk and leg strength. Exercise selection should follow how your symptoms behave: whether bending or arching eases them, and whether leg symptoms move upward or spread further down.
Key takeaways
- Match the exercise to the pattern. A back that eases with bending needs a different starting set than one that eases with arching. The same routine for everyone is why generic plans stall.
- Use the 24-hour rule, not pain-free movement. Discomfort up to about 3/10 that settles by the next day is acceptable. Feeling clearly worse the following morning is the signal to scale back.
- Direction of leg symptoms matters more than intensity. Tingling or pain that moves up toward the buttock is progress; symptoms travelling further down the calf or foot mean stop that exercise.
- Strength beats stretching for lasting change. Hips, glutes and a controlled hinge do more for repeat episodes than chasing flexibility in an already-guarded back.
- Consistency over novelty. Four to six exercises done most days for four weeks outperforms twelve different movements done once.
This is also built to give you more practical value than a random YouTube session. Videos can be useful, but they often miss three things that decide outcomes: (1) how to choose exercises based on your pain pattern or diagnosis, (2) clear “if-this-then-that” safety rules, and (3) a week-by-week progression that tells you exactly what to do next. This guide gives you a decision tree, diagnosis-informed options, and a progression framework, so what you do is guided and personalized from day one instead of copied.
The program is designed for common, non-emergency low back pain patterns (stiffness after sitting, aches after lifting, “tight” low back, mild referral into the buttock or thigh). It is not a substitute for diagnosis. If you have red flags (listed below), pause the program and seek urgent assessment.
You’ll get:
- A quick self-check to choose the right starting track
- A 7-day “calm it down” reset
- Disease-wise / diagnosis-informed exercise options (including reduced lumbar lordosis and spinal stenosis)
- A 4-week strength-and-control plan that progresses safely
- Clear do’s/don’ts, a symptom ruleset, and 10 practical FAQs

When should you stop exercising and get checked urgently?
Stop the program and seek same-day assessment if you develop changes in bladder or bowel control, numbness around the groin or saddle area, leg weakness that is getting worse, or a foot that drags. Fever, unexplained weight loss, a cancer history, recent significant trauma, or constant pain that no position relieves also need medical review before you continue exercising.
Do not continue this program if you have:
- New bowel or bladder control problems
- Numbness in the groin/saddle area
- Progressive leg weakness, foot drop, or rapidly worsening numbness
- Fever, unexplained weight loss, history of cancer, or recent serious infection
- Significant trauma (fall, accident) or suspected fracture
- Severe pain that is constant, unrelenting, and not position-dependent
If you’re uncertain, get assessed. Safety comes first.
Plain-language glossary (so the rest makes sense)
This guide avoids jargon, but a few everyday terms still help:
- Flare: a temporary spike in pain or symptoms that lasts hours to days. A flare does not always mean damage; it often means your back did more than it could handle that day.
- Muscle guarding: muscles tighten automatically to protect the area. People describe it as “locked,” “stuck,” or “can’t straighten.”
- Spasm: a sudden, strong muscle tightening that feels like a cramp or a “grab.” It can be painful, but it is often a protective response.
- Nerve symptoms: tingling, numbness, burning, or pain that travels down the leg.
- Centralize: leg symptoms move upward (toward the buttock or back) and become less intense. That is usually a good sign.
- Irritable back: your back gets angry easily. Small movements, sitting, or bending might trigger it. Irritable backs need smaller exercise doses at first.
- Neutral spine: not forced flat and not forced arched—your comfortable middle.
How do you know if a back exercise is safe to continue?
An exercise is safe to continue if discomfort stays at or below about 3 out of 10 while you do it, and your back feels the same or better roughly 24 hours later. Sharp, catching pain, symptoms spreading further down the leg, or a clearly worse next morning are the signals to reduce range, reduce reps, or swap that movement out.
These rules apply to every exercise in the program, so you never have to relearn safety when you change a movement.
The 24-hour rule
After a session, check symptoms later that day and the next morning:
- Green: discomfort up to 3/10 during exercise and you feel the same or better within 24 hours → continue as planned.
- Yellow: discomfort rises but settles back to your normal level within a few hours → continue, but reduce range, reps, or speed.
- Red: you feel clearly worse the next day, or leg symptoms travel farther down the leg → stop that exercise and switch to another option.
Stop signs during a rep
Stop the rep or stop the exercise if you feel:
- Sharp, stabbing pain
- A sudden “electric” shock down the leg
- Increasing numbness or weakness
- Dizziness, chest pain, or shortness of breath
How do you choose the right exercises for your pain pattern?
Choose exercises using three quick questions: do you have symptoms below the knee, does bending forward or arching backward feel better, and how easily does your back flare right now? Leg symptoms point toward a nerve-sensitive track, your preferred direction sets the starting positions, and irritability sets the dose. Those three answers narrow a large exercise library down to four or five movements.
If low back pain were one single problem, one routine would work for everyone. Real life is messier, and matching the movement to the behavior of your symptoms is what separates a program from a playlist.
Step 1: do you have leg symptoms?
Answer yes or no:
- Tingling, numbness, burning, or pain that travels below the knee?
If yes, start with the sciatica/nerve-sensitive track later in this guide. That track has one special rule: symptoms should move upward (centralize), not spread downward.
Step 2: find your “better direction” (gentle test)
Try each movement for 5 easy reps. You are not testing your limits.
- Bending test: lie on your back and bring one knee toward your chest a little, then return.
- Arching test: lie on your stomach and prop up on elbows a little, then relax.
Which one makes you feel looser or calmer?
- If bending feels better, you’ll likely do well with a flexion-friendly track (often helpful in stenosis).
- If arching feels better, you’ll likely do well with an extension-friendly track (often helpful in some leg-symptom patterns).
- If both feel okay, start with the general track.
Step 3: how reactive is your back today?
If small movements set you off, start with short sessions and the 7-day reset. If you tolerate movement well, you can progress faster.
Exercise Library: step-by-step instructions (use once, then refer back)
This section is detailed so you do not need a video for technique. Later in the program, when an exercise is listed again, it means “do that exercise using the steps in the library above.” This prevents repetition while keeping the plan easy to follow.
1) 90/90 breathing on a chair
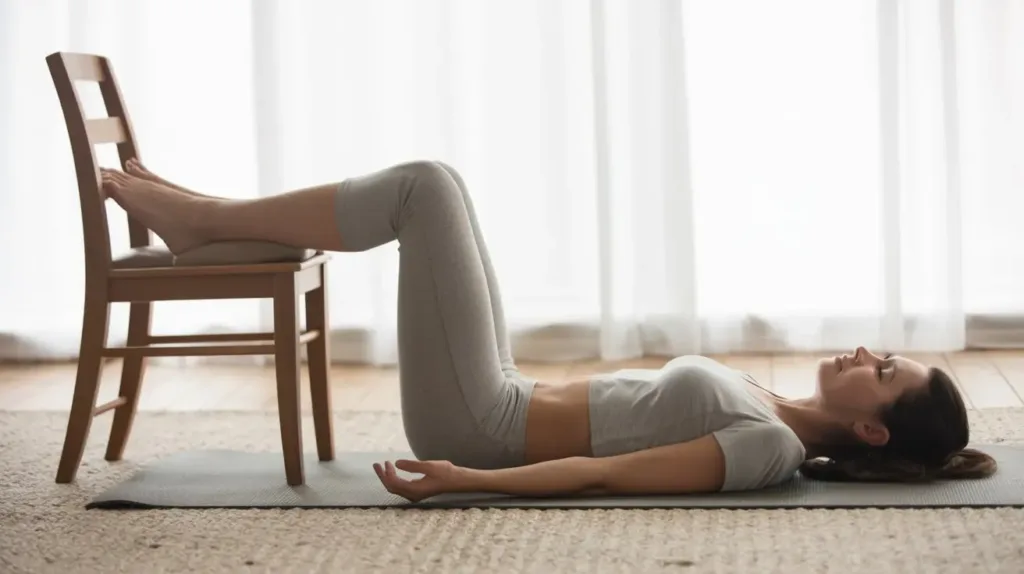
Purpose: reduce protective tension, improve calm breathing, and help you find a comfortable middle position.
How to do it:
- Lie on your back with calves on a chair so hips and knees are bent about 90 degrees.
- One hand on chest, one hand on belly.
- Breathe in through your nose for 3–4 seconds.
- Breathe out through your mouth for 5–6 seconds, slow and controlled.
- Do 6–10 breaths.
Do:
- Keep shoulders relaxed.
- Breathe quietly.
Don’t:
- Hold your breath.
- Force your low back flat.
Stop if:
- You feel dizzy.
2) Pelvic tilt to neutral
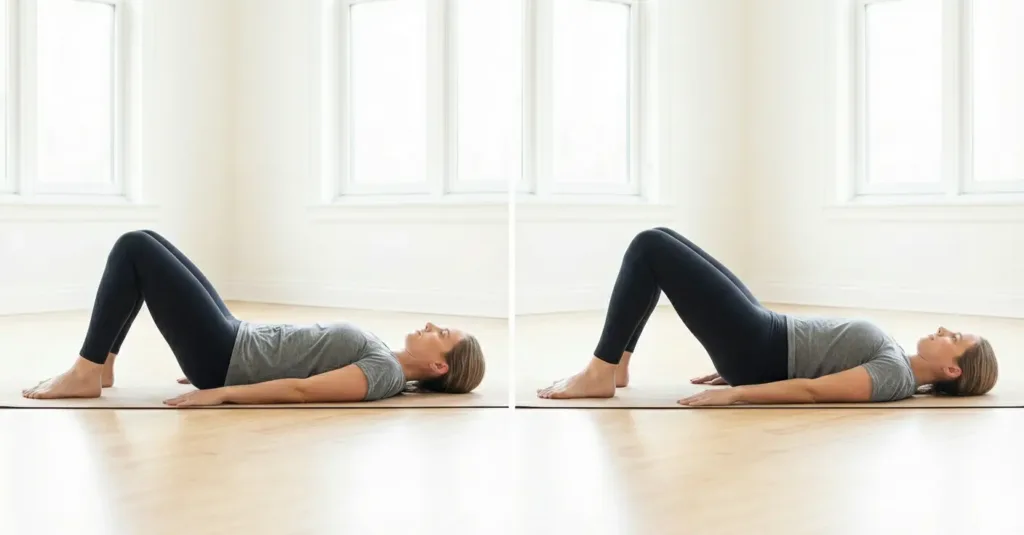
Purpose: teach your pelvis and low back to find the “middle,” not stuck flat or stuck arched.
How to do it:
- Lie on your back with knees bent, feet on the floor.
- Gently flatten the low back a little, then gently arch a little.
- Find the middle that feels easiest.
- Repeat slowly for 8–12 reps.
Do:
- Keep motion small.
Don’t:
- Push hard to extremes.
Stop if:
- Sharp pain or worsening leg symptoms.
3) Knee rocks
Purpose: gentle motion for stiffness without forcing a stretch.
How to do it:
- On your back with knees bent, feet on floor.
- Keep knees together and let them fall a few inches to one side.
- Return, then fall to the other side.
- Continue 60–90 seconds.
Do:
- Move like a pendulum.
Don’t:
- Force knees to the floor.
Stop if:
- Pain climbs and stays high afterward.
4) Cat-camel
Purpose: smooth spine motion and control.
How to do it:
- Hands and knees: hands under shoulders, knees under hips.
- Round your back gently (exhale).
- Let your back relax to a mild arch (inhale).
- Do 6–10 slow reps.
Do:
- Keep it smooth.
Don’t:
- Drop into a deep arch if that irritates you.
Stop if:
- Leg symptoms spread downward.
5) Hip hinge rehearsal
Purpose: teach your hips to bend so the low back does not do all the work.
How to do it:
- Stand feet hip-width, knees slightly soft.
- Push hips back as if closing a car door with your butt.
- Keep chest gently lifted, back long.
- Return to standing by squeezing glutes lightly.
- Do 8–12 reps.
Do:
- Move slowly.
Don’t:
- Round your back into a C-shape.
Stop if:
- Sharp pain or worsening leg symptoms.
6) Glute bridge
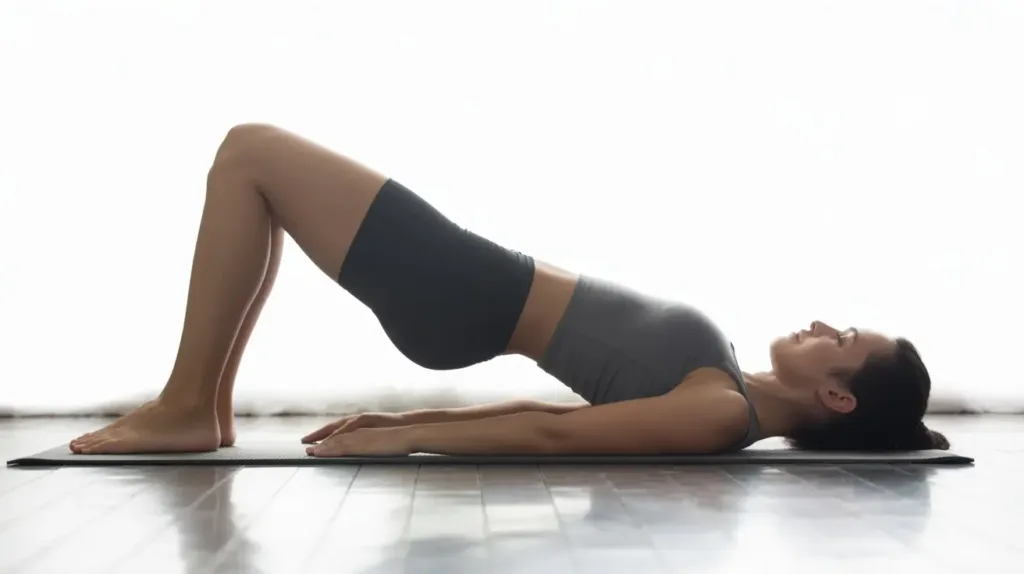
Purpose: strengthen hips so your back shares load with strong glutes.
How to do it:
- Lie on back, knees bent, feet hip-width.
- Light belly brace.
- Press through heels, lift hips until shoulders-hips-knees form a line.
- Pause 1–2 seconds, lower slowly.
- Do 6–12 reps.
Do:
- Keep it hip-driven.
Don’t:
- Lift so high that the low back pinches.
Stop if:
- Strong hamstring cramps persist (reduce range first).
7) Dead bug (heel taps)
Purpose: core control without crunching or twisting.
How to do it:
- Lie on back, hips/knees at 90 degrees (or keep one foot down).
- Ribs gently down, light belly brace.
- Tap one heel to floor, return.
- Alternate sides for 6–10 reps each side.
Do:
- Move slowly enough to stay controlled.
Don’t:
- Let the low back arch sharply.
Stop if:
- Sharp increase in symptoms.
8) Bird dog
Purpose: coordination between trunk and hips.
How to do it:
- Hands and knees.
- Light belly brace.
- Slide one leg back and straighten; lift slightly if stable.
- Optionally reach opposite arm forward.
- Hold 2 seconds, switch sides, 5–8 reps each.
Do:
- Keep hips level.
Don’t:
- Swing leg high or arch back.
Stop if:
- Sharp pain or spreading leg symptoms.
9) Side plank on knees

Purpose: side trunk strength to stabilize the spine.
How to do it:
- Lie on side, knees bent, forearm under shoulder.
- Lift hips to form a straight line shoulders-hips-knees.
- Hold 15–30 seconds, repeat 2–3 times each side.
Do:
- Keep shoulder away from ear.
Don’t:
- Let hips roll backward.
Stop if:
- Sharp shoulder pain or symptom spike.
10) Supported split squat

Purpose: leg strength with a stable trunk.
How to do it:
- Stand near a wall or chair for support.
- Step one foot back into a split stance.
- Lower a few inches by bending both knees.
- Push through the front foot to rise.
- Do 6–10 reps each side.
Do:
- Start with small range.
Don’t:
- Let the front knee collapse inward.
Stop if:
- Back pain spikes; reduce range or switch to sit-to-stand.
11) Sit-to-stand
Purpose: strength for daily tasks.
How to do it:
- Sit tall on a chair, feet under knees.
- Lean slightly forward from hips (use hip hinge feel).
- Stand, then sit down slowly with control.
- Do 6–12 reps.
Do:
- Use hands lightly if needed.
Don’t:
- Drop back into the chair.
Stop if:
- Sharp pain or dizziness.
12) Suitcase carry
Purpose: train real-life stability.
How to do it:
- Hold a light weight or bag in one hand.
- Stand tall, ribs over pelvis.
- Walk 20–40 steps, switch hands, repeat.
Do:
- Keep shoulders level.
Don’t:
- Lean into the weight.
Stop if:
- Sharp increase in symptoms.
Disease-wise tracks: pick the set that fits you
If you already know your diagnosis, use the matching track below. If you do not know, choose the track that makes you feel calmer after a short trial.
Track A: reduced lumbar curve (loss of lordosis / “flat back feel”)
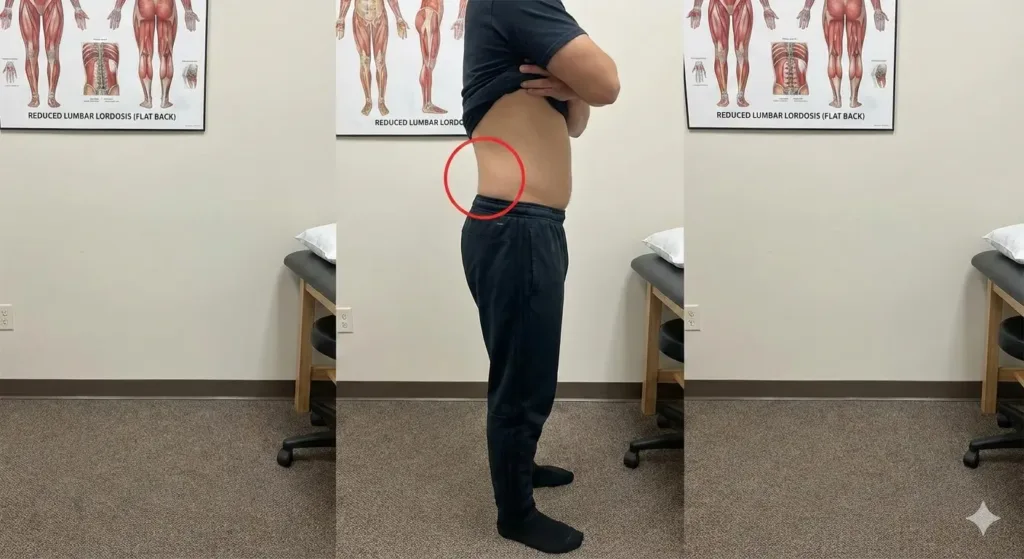
What it can feel like:
- Low back feels flat and tired after sitting
- Standing feels uncomfortable
- Hips feel stiff; hamstrings feel tight
Choose these from the Exercise Library:
- 90/90 breathing on a chair
- Pelvic tilt to neutral
- Hip hinge rehearsal
- Glute bridge
- Dead bug
- Sit-to-stand
Limit for now:
- Long slumped sitting without breaks
- Aggressive toe-touch stretching if it flares you
Why this track helps:
It restores movement variety and hip strength so the low back is not the only place that bends and works.
👨⚕️ Dr. Arora’s Clinical Note:
Many patients ask me if stretching is the “missing piece” for low back pain. Here’s the counter-intuitive truth: a lot of what feels like tightness is actually protective guarding, not a true muscle shortness problem. If you stretch guarding, you often teach the nervous system that the area is “unsafe,” and symptoms can linger or flare.
A simple clinical shortcut: if a stretch gives a sharp, nervy, or “electric” feel (or makes leg symptoms travel farther), don’t stretch it yet. Instead, use isometrics to calm the system and recruit support muscles without provoking the back. Try this for 3–5 days:
- Bridge hold (small range): lift only until comfortable, hold 10 seconds × 5 reps, rest 20–30 seconds.
- Wall sit (shallow): hold 15–25 seconds × 3, keep ribs over pelvis.
- Then re-test a gentle stretch: if it feels easier (not sharper), you’ve “earned” stretching back safely.
Track B: lumbar spinal stenosis (often prefers bending-forward positions)
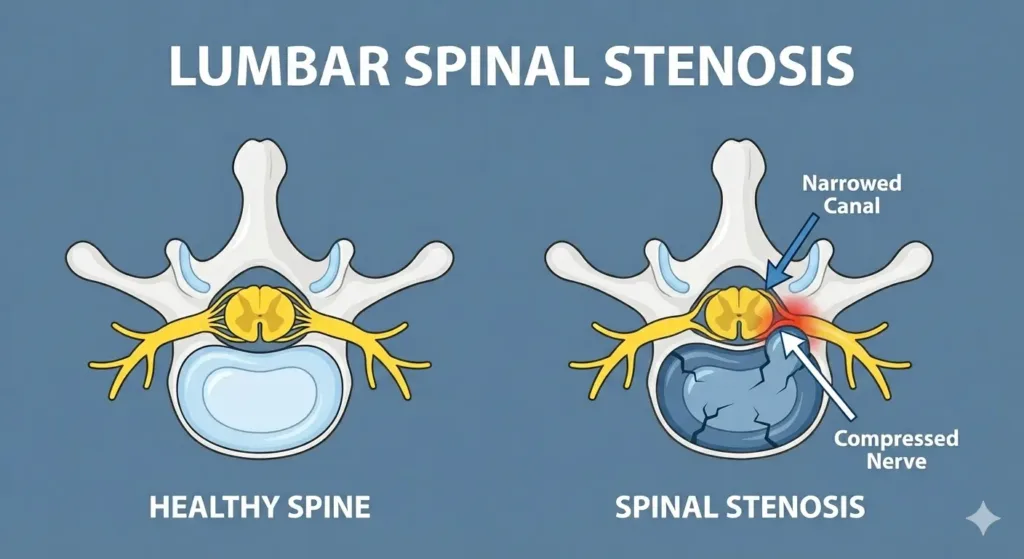
What it can feel like:
- Leg heaviness, cramping, numbness, or pain when standing or walking
- Relief when sitting, bending forward, or leaning on a cart
Choose these from the Exercise Library:
- 90/90 breathing on a chair
- Pelvic tilt to neutral
- Knee rocks
- Dead bug
- Glute bridge (small range)
- Suitcase carry (light)
Walking rule for this track:
Use intervals: walk 2–6 minutes, sit 1–2 minutes, repeat.
Limit for now:
- Long standing in a big arch posture
- Long downhill walks if they worsen symptoms
Track C: sciatica or nerve-sensitive leg symptoms
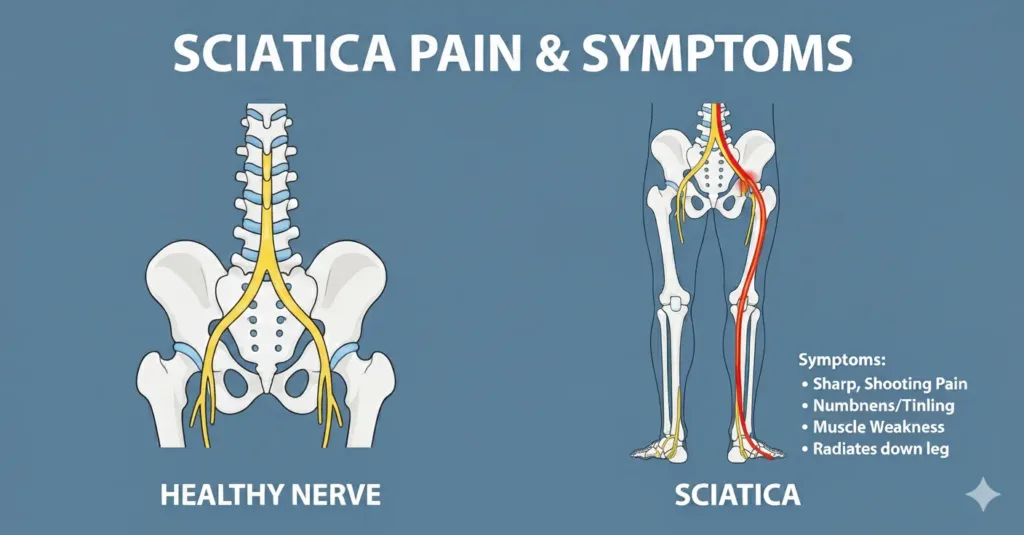
What it can feel like:
- Tingling, numbness, burning, or pain that travels down the leg
- Sitting, bending, or standing changes symptoms quickly
Use these from the Exercise Library:
- 90/90 breathing on a chair
- Pelvic tilt to neutral
- Knee rocks
- Dead bug (use the easier version if needed)
- Suitcase carry (very light, only if tolerated)
Then add a direction bias (do not guess; test it):
- If arching helps and leg symptoms move upward, add the prone-on-elbows drill in the “Nerve Symptoms Add-On” section.
- If bending helps and symptoms calm, add the single knee-to-chest drill in the “Nerve Symptoms Add-On” section.
Limit for now:
- Stretching into leg pain
- Long sitting without breaks
Track D: extension-sensitive back (often facet irritation or spondylolisthesis patterns)
What it can feel like:
- Pain worse with arching backward or standing too long
- Pain with twisting plus arching
Choose these from the Exercise Library:
- 90/90 breathing on a chair
- Pelvic tilt to neutral
- Dead bug
- Bird dog
- Side plank on knees
- Supported split squat
- Suitcase carry
Limit for now:
- Deep backbends or repeated arching drills
The Calm-Down Reset (Days 1–7)
This is the first phase for most people. It lowers irritability and builds confidence before heavier work.
Daily plan (10–15 minutes):
- Downshift: 90/90 breathing on a chair (see Exercise Library)
- Gentle motion: knee rocks or cat-camel (see Exercise Library)
- Control + strength: pick 2 exercises from your track (use the library steps)
- Optional short walk: 5–12 minutes if it helps
If you wake up stiff:
Do a mini-session in the morning and another later. Two small doses often work better than one big session.
If you feel “locked up”:
Use smaller ranges. Your goal is to feel even 10–20% easier after the session.
The 4-week low back pain exercises physical therapy home program
This is the capacity phase: you strengthen hips, legs, and trunk so everyday tasks stop re-triggering symptoms. The table below shows what each phase is trying to achieve and, more usefully, the specific sign that tells you it is time to move on.
| Phase | Main goal | Typical work | Ready to progress when… |
|---|---|---|---|
| Reset (Days 1–7) | Lower irritability and restore confident movement | 90/90 breathing, knee rocks, cat-camel, short frequent walks, gentle pelvic tilts | You can complete a full session with discomfort under 3/10 and feel the same or better the next morning, two days running |
| Week 1 — control | Learn to hold a neutral spine while the limbs move | Dead bug heel taps, bird dog, glute bridge, hip hinge rehearsal | You can do bird dog and dead bug without the low back arching or the pelvis rocking, and without breath-holding |
| Week 2 — endurance | Repeat work without a next-day rebound | Same exercises, added reps or 5-second holds; side plank on knees; longer walks | You can repeat the same session on consecutive strength days with no flare, and walking distance has increased |
| Week 3 — strength | Load the hinge and the legs | Loaded hinge, supported split squat, sit-to-stand, suitcase carry | A loaded hinge feels driven by the hips and glutes rather than the low back, and sit-to-stand no longer needs hands |
| Week 4 — capacity | Rehearse real-life tasks | Heavier carries, longer standing and walking, floor-to-waist lifting practice | You can carry groceries, manage stairs and sit through a normal workday without planning your movements around the pain |
Progress rules (choose one change only):
- Add 1–2 reps
- Add 5 seconds to holds
- Add a small load (backpack, band)
- Slow the lowering phase
Weekly schedule:
- Day 1: Strength A
- Day 2: Mobility + walking
- Day 3: Strength B
- Day 4: Mobility + walking
Optional: short easy walk on other days
Warm-up (5 minutes):
- 90/90 breathing on a chair
- Cat-camel or knee rocks
- Hip hinge rehearsal
(See the Exercise Library for how to do each.)
Week 1: confidence and control
Week 1 is about feeling safer with movement and finishing sessions feeling steadier.
Strength A:
- Choose 4 items: one hip strength (bridge), one core control (dead bug), one stability (side plank or bird dog), and one carry.
- Do 3 sets for the first three items; do 4 carry walks.
Strength B:
- Choose 4 items: one stability (bird dog or side plank), one leg strength (split squat or sit-to-stand), one hinge practice, and one carry.
Walking day guidance:
- If walking helps, do 10–20 minutes total.
- If you are on the stenosis track, use walking intervals.
Week 2: build endurance
Week 2 is where you prove to your back that you can repeat work without a rebound flare.
Keep the same exercise list and progress only one variable. The biggest mistake at this stage is changing exercises too often; consistency beats novelty.
Add two movement breaks daily:
Every 30–45 minutes of sitting:
- Stand and do 6 hip hinges OR walk for 60 seconds.
Week 3: strengthen the hinge and legs
This is the phase where the work starts translating into easier lifting, stairs, and longer days.
Strength A:
- Glute bridge: 3×10 (or add a 2-second pause)
- Dead bug: 3×8 each side
- Sit-to-stand: 3×10 (slow down on the way down)
- Side plank: 3×20–40 seconds
Strength B:
- Hip hinge rehearsal: 3×10 (add a backpack only if Week 2 was stable)
- Supported split squat: 3×8 each side
- Bird dog: 3×6 each side with a 2-second pause
- Suitcase carry: 4×30–40 steps
Week 4: return-to-life capacity
Think of Week 4 as “practice for real life”: carry, stand, walk, and bend with fewer consequences.
Strength A:
- Hip hinge with light load (backpack): 3×8
- Supported split squat: 3×8 each side
- Suitcase carry: 4×40 steps
- Dead bug: 2×8 each side
Strength B:
- Sit-to-stand: 3×12
- Stair practice: 2–3 minutes with breaks (if tolerated)
- Side plank: 3×30–45 seconds
- Bird dog: 2×8 each side
Nerve Symptoms Add-On (only if you have leg pain/tingling)
For nerve symptoms, exercise selection follows one priority: symptoms should not spread farther down the leg.
Choose ONE direction add-on, based on your gentle direction test:
If bending helps:
- Single knee-to-chest: 6 reps each side, small range, then stop.
If arching helps:
- Prone on elbows drill:
- Lie on stomach.
- Prop on elbows for 10–20 seconds.
- Relax for 20 seconds.
- Repeat 4–6 times.
Use the 24-hour rule. If symptoms spread farther, stop that add-on and switch.
What daily habits speed up recovery from low back pain?
Three habits move the needle most: breaking up long sitting every 30 to 45 minutes, hinging at the hips instead of rounding the low back when you pick things up, and walking short distances several times a day rather than one long walk. Sleep position matters too — a pillow between or under the knees reduces overnight guarding.
These are not extra homework. They stop you feeding the same trigger for sixteen hours a day and then trying to undo it in a twenty-minute session.
Sitting plan (simple)
- Change position every 30–45 minutes.
- Use a small rolled towel at the low back if it feels better.
- Do not chase “perfect posture.” Aim for “comfortable, changeable posture.”
Lifting plan (simple)
- Use the hip hinge feel you practiced.
- Hold objects close to your body.
- Exhale gently during effort.
Sleep comfort (simple)
- Side sleeper: pillow between knees.
- Back sleeper: pillow under knees.
Small comfort changes can reduce overnight guarding, so morning sessions feel easier.
The evidence behind this approach is reassuring rather than dramatic. A Cochrane systematic review of exercise therapy for chronic low back pain found moderate-certainty evidence that exercise reduces pain more than no treatment, usual care or placebo, with a mean difference of about 15 points on a 0–100 pain scale at earliest follow-up; gains in function were smaller and did not reach the reviewers’ threshold for a clinically important difference. In other words, exercise reliably takes the edge off pain, but the day-to-day functional wins come from doing it consistently and progressing the load. UK national guidance takes the same line, recommending structured exercise programs while advising clinicians not to routinely offer imaging for low back pain in non-specialist settings — which is why a scan is rarely the first step when there are no red flags.
Used the way it is laid out here, low back pain exercises physical therapy is less about finding a magic stretch and more about a sequence: settle the irritation, restore control, then rebuild capacity until ordinary life stops feeling risky. Pick your track, keep four to six exercises, apply the 24-hour rule, and reassess at the end of four weeks. If symptoms are unchanged or worsening by then, that is the point to get a hands-on assessment rather than to try a different video.
FAQs
1) How many exercises should I do per day?
Most people do best with 4–6 exercises total. A smaller set done consistently usually beats doing 12 different moves once.
2) How long should a session take?
During Week 1, 10–15 minutes is enough. Later, 20–30 minutes on strength days is typical.
3) Should I stretch daily?
Stretching can help if it makes you feel better and does not flare symptoms. Many people improve more from strength and control than from aggressive stretching.
4) Is walking always good?
Walking often helps, but dose matters. If walking flares you, use shorter intervals with breaks and build gradually.
5) If I have spinal stenosis, is bending forward “bad posture”?
Not necessarily. Many stenosis patterns feel better with a slight forward lean. The goal is function and symptom control.
6) If I have loss of lordosis, should I force an arch?
No. Forcing an arch can irritate some backs. Build neutral control and hip strength instead.
7) What if I feel pain during an exercise but better afterward?
That can happen. Use the 24-hour rule. If you are not worse the next day, it is usually fine to continue with small adjustments.
8) When can I return to gym lifting?
When daily activities are improving and you can hinge and sit-to-stand without a next-day flare. Start lighter, fewer sets, and progress slowly.
9) Why do hamstrings cramp during bridges?
Often the glutes are not contributing enough. Reduce range, focus on pressing through heels, and build gradually.
10) What is the fastest way to prevent flares from returning?
Build baseline capacity: hips, legs, carries, walking, and frequent position changes. That combination is what makes the result durable.
References
- Hayden JA, Ellis J, Ogilvie R, Malmivaara A, van Tulder MW. Exercise therapy for chronic low back pain. Cochrane Database of Systematic Reviews. 2021;9(9):CD009790. doi:10.1002/14651858.CD009790.pub2. https://pubmed.ncbi.nlm.nih.gov/34580864/
- National Institute for Health and Care Excellence (NICE). Low back pain and sciatica in over 16s: assessment and management. NICE guideline NG59. Published 30 November 2016; last updated 11 December 2020. https://www.nice.org.uk/guidance/ng59